Back when Elementor released the request parameters feature to Elementor Pro, I picked up a little trick that I get comments on all-the-time.
It’s simple— but a really nice touch to fancy-up your Thank You pages (an often underutilized part of any optin!).
I’m going to show you how you can quickly and easily set up this system to dynamically insert your visitors name right into the Thank You page, like this:

Note: There’s a video visual-walkthrough at the end of this post.
It’s a small detail— but one that almost always elicits comments from people. Little details like this (especially personalized details) can go a long way in polishing things off.
Step 1: The Optin Form
The first step will all be done inside wherever you have the optin form hosted on your site (this could be directly on the page, or inside of a popup).
Using the Elementor Form widget, we need to tweak a couple of things here.
Step 1a: Inside the settings of your Form widget, you’ll want to make sure you are collecting the visitor’s name (in most cases, a first name is all you want).
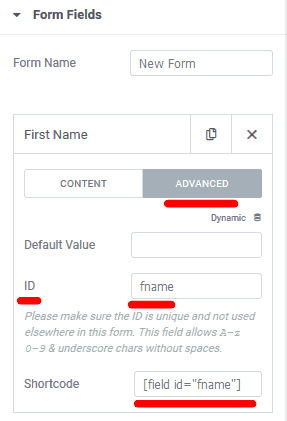
Inside the form field for name, tab to the “Advanced” settings and take note of the “ID” and “Shortcode” (I like to just paste all these into a quick notepad file for reference later).
It doesn’t matter what you use as your form ID, just so long as you know what it is (in the example I use “fname” to reference the visitors “first name”).
Step 1b: You’ll want to setup a redirection for your thank you page after the form is submitted. To do this, navigate to the “Actions After Submit” tab inside the Form settings and select “redirect” from the drop down list.

After “Redirect” is added to your actions, you’ll get a new tab labeled “Redirection” in the Form settings.
Step 1c: Open the Redirect tab and type in your URL for your Thank You page (if you don’t have one setup, you’ll want to go ahead and at least create this page down so you have a URL to insert.
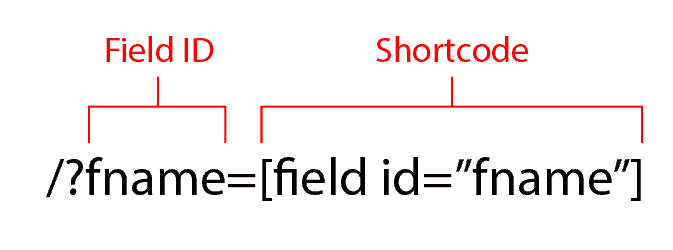
At the END of your URL you need to add a request parameter that will transfer the visitors name into the Thank You page.
You need to add: /?fname=[field id=”fname”]
Note: The above example assumes you use the “fname” field ID just like I did in the example. If you changed your Field ID, you’ll want to use your Field ID in place of “fname” in the example above.
Step 2: The Thank You Page
Next, you’ll want to open your Thank You page you’ve created in the Elementor editor.
I like to use a “Heading” widget for the Thank You at the top of the page.
Instead of typing “Thank You” inside the Title, you need to click the “Dynamic” link, here:
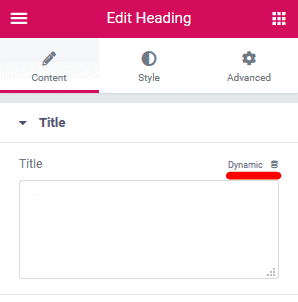
This will trigger a drop down. You’ll need to scroll down until you see the option for “Request Parameter” under the subheading “Site”.
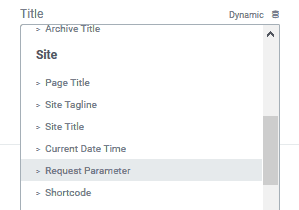
Next, you need to click the small, gray “wrench” icon just to the left of the Title field that now says “Request Parameter”.

Leave the Type on “Get” in the first section.
In the section field, you need to put your Field ID inside the Parameter Name field (in our example that is “fname” (without the quotation marks)).
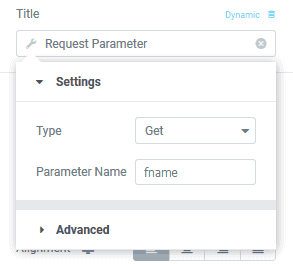
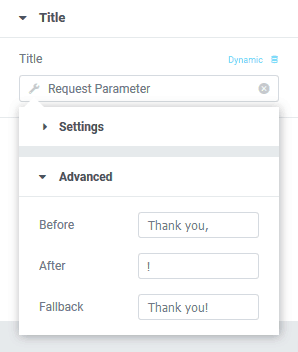
Now, click on the Advanced tab to reveal a few more options. This will give you the ability to customize the message both before and after the dynamic name you’re bringing in via the Request Parameter.
Typically, I will put “Thank you, “ in the Before field (note that I have an intentional space after the comma- this is so their is an appropriate space between the comma and the visitor’s name).
In the After field, I include my punctuation (like an exclamation point).
Lastly, it’s important to fill in the Fallback field which is what will be shown if there is any kind of hiccup and the request parameter isn’t brought in. Usually I’ll just put a generic “Thank you!” in that spot.
Here’s a quick video of the process in action…
That’s it!
At this point, you’re all set— you’ll just want to test out your form and thank you page to ensure everything is working properly.
When you submit a form, you’ll see the URL in your Thank You page now has whatever name you put in the name field as a URL query.
While these instructions look like a lot— once you’ve done it a couple times it only takes a minute to setup and it’s a very nice little touch to personalize your message to your visitors.
Get Elementor Pro!
If you don’t already have a copy of Elementor Pro, and this little tut pushed you over the edge on pulling the trigger, we’d greatly appreciate your use of our affiliate link as Elementor Pro is a product we love and use daily!


