The full-length screenshots of websites we’ve created are great — but having a giant, skinny image on a page is a bit of a nightmare to design around.
The scrolling image effect is a nice way to keep the image constrained to manageable size, while allowing people to see the full screenshot, from top to bottom, by allowing the image to scroll when you hover over it.

I recently applied this effect to my new “simplified” portfolio page on my agency’s website and have had a couple people in our community asking how it was done.
Thankfully, it’s quite easy, and requires just a small bit of completely customizable CSS (which I’ll be sharing below).
There’s likely ways you can do this in your page builder of choice, but since I built with Generate Blocks, that’s what I’ll be using for this demonstration.
Step 1 – The Structure
I’ll assume you want to do something similar to the example I provided above from my portfolio, so the first thing we need to do is create the structure for this layout.
For that, we need to create a container, and inside it put a grid with 2 columns.
The column on the left will hold our image, and the column on the right will hold our text.
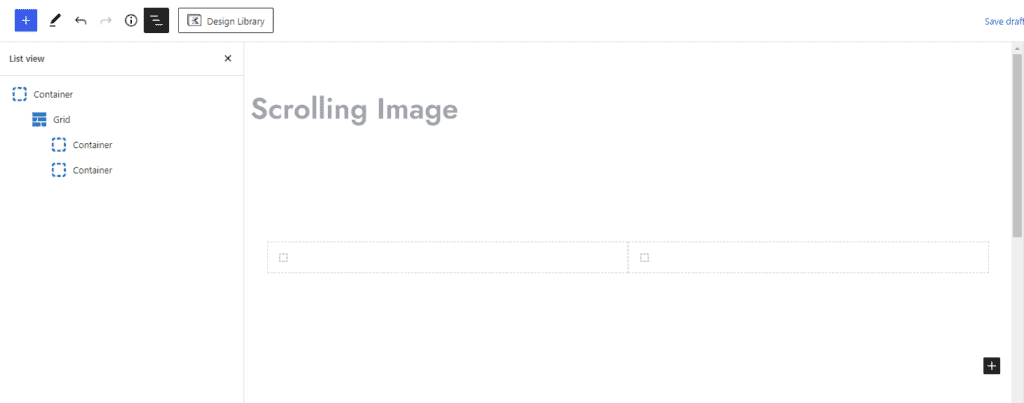
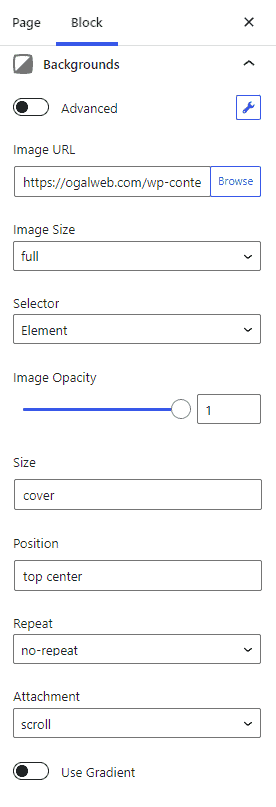
Select the container of your left column inside the grid, and under the “Backgrounds” settings insert the image URL from your source image (the image you want to scroll on hover), then use the following settings:
- Size: full
- Selector: Element
- Image Opacity: 1
- Size: cover
- Position: top center
- Repeat: no repeat
- Attachment: scroll
Finally, under the “Advanced” tab, we need to assign a class to this container. In my example (and the CSS provided below) I used the class “scroll-image”. You’re welcome to change that to whatever you’d like, but make sure to change it in the CSS too!
Note: You’ll want to go ahead and put some content in the right hand column. The height of your columns will be determined by how much content is in there, and at this point (assuming it’s still blank) your scrollable image won’t show up.
It should look something like this:

Save your page, and let’s move on to the CSS.
Step 2 – The CSS
Now, we have to add the CSS to make the scroll happen when you hover over the image.
All you need to do is copy/paste the CSS below into your website wherever you store additional CSS (this could be in your child theme’s stylesheet, or simply in the customizer).
Here’s what you’ll copy & paste:
.scroll-image {
background-position: 0 0;
-webkit-transition: background-position 3s ease-in-out;
-moz-transition: background-position 3s ease-in-out;
-ms-transition: background-position 3s ease-in-out;
-o-transition: background-position 3s ease-in-out;
transition: background-position 3s ease-in-out;
}

.scroll-image:hover {
background-position: 0 100%;
}
Let’s talk about the CSS
The CSS for this is pretty simple, but you may need to fine-tune it a bit. The speed in which the image scrolls on hover is determined by the transition time in the CSS (in the example above it’s set to 3 seconds).
For short images, this might be much too slow.
For extremely long images, this might be way too fast.
You’ll just need to play with this number and adjust it to your preference.
The longer the image, the longer time you’ll want your transition to be.
Whatever duration you choose, you’ll have to adjust in the CSS in all the different fallbacks for the transition duration (everywhere it says “3s” in the CSS I supplied to you).
That’s it!
Everything should be working now! Keep in mind, this effect will only display on the front end of your site (not inside the editor).
Of course, you don’t have to use this exact same implementation — this same idea could be used in a variety of applications.


