I recently found myself in a position where I needed to add some tooltips for more context to a row of buttons. Unfortunately, there’s no settings inside GenerateBlocks to add tooltips, and the last thing I wanted to do was install an entire plugin just to handle this simple feature.
Thankfully there’s an easy way to do it with a pinch of CSS and taking advantage of the built-in Custom Attributes feature.

CSS for the Tooltip
For the CSS, I found an awesome video by Web Dev Simplified that walks you everything you need to setup this tooltip.
I’ll provide the copy/paste CSS below, but if you want to get a good handle on how everything works (in case you want to manipulate it and don’t know where to start), I’d suggest watching the video.
Here’s the CSS you need to copy and paste into your site’s child theme or additional CSS in the customizer:
.tooltip{
	position: relative;
}

.tooltip:before,
.tooltip:after{
	--scale: 0;
	--arrow-size: 8px;
	--tooltip-color: hsla(191, 0%, 95%, 0.9);
        --tooltip-text-color: #222222;
	position: absolute;
	top: -.25rem;
	left: 50%;
	transform: translateX(-50%)  translateY(var(--translate-y, 0)) scale(var(--scale));
	transition: 150ms transform;
	transform-origin: bottom center;
}

.tooltip:before{
	--translate-y: calc(-100% - var(--arrow-size));
	content: attr(data-tooltip);
        color: var(--tooltip-text-color);
	font-size: .8rem;
	line-height: 1;
	padding: .4rem .6rem;
	width: max-content;
	background: var(--tooltip-color);
	border-radius: .3rem;
	text-align: center;
}

.tooltip:hover:before,
.tooltip:hover:after{
	--scale: 1;
}

.tooltip:after{
	--translate-y: calc(-1 * var(--arrow-size));
	content:'';
	border: var(--arrow-size) solid transparent;
	border-top-color: var(--tooltip-color);
	transform-origin: top center;
}
This CSS will give you a small, light gray, semi-transparent tooltip with dark grey text. If you want to manipulate the colors, you can change the values in the –tooltip-color and –tooltip-text-color variables.
Adding Your Tooltip Class
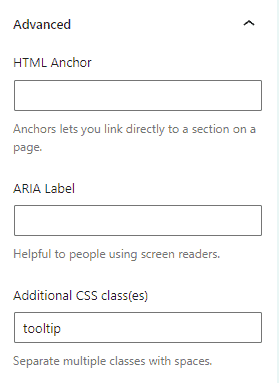
To add the tooltip to any GenerateBlocks element, select the element and type in the word tooltip into the “Additional CSS class(es)” field under the “Advanced” tab.
Adding Your Tooltip Text
What’s really neat about this tooltip solution is that it uses the data attributes built into GeneratePress to create the text for your tooltip.
This means you only have to put in the CSS for the tooltip once, and you can control the content on an element-by-element basis without using JS to bring in text from your HTML to your CSS.
Setting your tooltip text is simple:
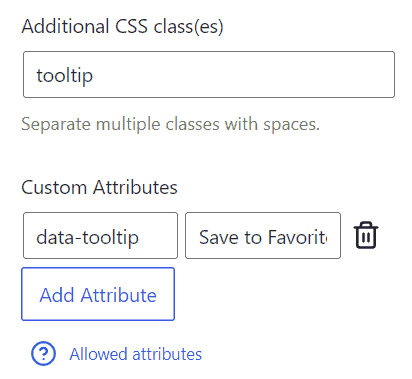
With your element still selected, in the “Advanced” tab, just underneath where you added the “tooltip” class, click the “Add Attribute” button.
In the first field type: data-tooltip. In the second field, type in the text you want to appear inside of your tooltip (in the example below, the tooltip will say “Save to Favorites”).
Checking Your Work
With the CSS added to your stylesheet, the selector added to your element, and the custom attribute set, your tooltip should be ready to go!
At this point, you can add a tooltip to any GenerateBlock element by simply adding the class and the custom attribute.
Keep in mind, the tooltip will not display on the backend while you’re editing, so you’ll have to save your work and view it on the front end to confirm everything is working correctly.
