I recently did a livestream where I shared the latest version of my Starter Site — here’s a link in case you missed it — and several people commented about me using a GeneratePress child theme.
So, today I decided to talk a bit about how you can set up your very own GeneratePress child theme.
But before we get into how to do it, let’s talk about why you might want to do it.
Why Use a Child Theme?
When you install a theme, like GenreatePress, you import a bunch of settings they’ve configured for you. Over time you might realize that you’d like to do things slightly differently and make tweaks to the way the theme works.
For example, I do things like add a custom user role for my clients, tweak the design of the login page, implement a design system, and more (you can see a lot of my tweaks explained in the starter site video I mentioned earlier).
However, if you just went in and updated the theme files directly, the next time they push out an update, it would override all of the customizations you made.
That’s where a child theme comes in. A child theme is like a “sub” theme of the parent theme. It looks to the parent theme for all its instructions, but it has the autonomy to add rules on top of the parent theme that won’t get overridden by updates.
When you’re just getting started this might not be important, but as you get more and more comfortable customizing WordPress, chances are you’re going to find some things you want to tweak.
Now, you can do this with a plugin like Code Snippets or WP Code Box — and I used Code Snippets for this very purpose for a long time.
However, there are 3 main reasons why I’ve ditched the code plugin in favor of the child theme.
Why A Child Theme Over Snippets Plugin?
I’m not going to say if you’re using a snippets plugin that you’re doing it wrong — like I said, I’ve used them a ton — but here’s why I’ve chosen not to use them.
- Performance & security. Code snippet type plugins introduce more code than I actually take advantage of, and some people argue that it introduces unnecessary security risks. I’m not one of those who is counting the number of plugins and deciding if a site is good or bad based on that… but every plugin you install, by nature, increases your chances for issues — so less is typically better, IMO.
- Portability. Child themes give you the ability to easily package up all your tweaks and take them from site-to-site. I keep a copy of my child theme on my computer and can upload it to any site using GenerateBlocks and instantly have all my customizations done in seconds.
- Branding. Child themes give you the unique ability to personalize and brand the theme, which is a nice personal touch. Some people brand this with their client’s information, while others (including myself) brand this with my agency’s information. Either way, it looks more custom than a 3rd party name.
In the end, there is no downside to using a child theme — even if you never make any tweaks. But if you build a site without one, it’s time consuming to go add one later.
For this reason, I think it just makes sense to start every project with a child theme and have those benefits there from the start should I ever need them.
Thankfully, setting up a bare-bones child theme is actually pretty simple.
Next, I’m going to show you how to set up a blank child theme, how to customize it with your own branding, and where you can add your snippets of code to start customizing things even further.
How to Create a Child Theme
If you want to get started quickly with the least amount of work, GeneratePress provides us with a blank child theme you can download. These files are simple to create on your own, but downloading the blank child theme saves time and is as bare-bones as you can get.
We’ll go ahead and download a copy for ourselves.
With the child theme downloaded, all we have to do is upload and activate the blank child theme and we’re good to go.
Remember, we have to have the parent theme installed, and if you try to install a child theme without the parent you will be reminded of that.
How to Customize Your Child Theme
Of course, this blank child theme doesn’t really do anything except set us up for the ability to further customize things down the line.
We’ll go ahead and install our child theme straight from the blank child theme GeneratePress provides and take a look.
Installing Blank Child Theme
Go to appearance > themes > and click the ‘Add New’ button. Here you’ll upload the blank child theme you just downloaded and install & activate it.
The blank child theme does come with some defaults, so you’ll see those here in the theme details and screenshot.

Before we start tweaking them, however, I think it’s important to first understand how a child theme works.
We can do that by digging into the files and code that come with the blank child theme you downloaded.
The Anatomy of a Child Theme
If you unzip the child theme you downloaded, you’ll see 3 files inside:
- functions.php
- style.css
- screenshot.png
Each of these files have their own purpose, so let’s talk about each one individually…
Functions.php
Go ahead and open up the functions.php file. On my machine, it’s going to open up in VS Code, which is free and my code editor of choice — but you can open this file in a simple notepad app.
Inside this file you’re going to see the opening PHP tag, and then a comment from GeneratePress giving you instructions about the functions.php file.

The important thing to note here is the comment that says “Only edit this file if you have direct access to it on your server”. The reason this is critical is that if you add some erroneous PHP to this file, you could easily break your website.
A common error you’ll see is what we call the ‘White Screen of Death’. When that happens, you’ll have to have access to your website from the sever level to fix issues as your ability to login from the front end will be completely lost.
The functions.php is the most advanced of the three, but this where you can add PHP code to your theme to change the behavior of your site.
Just as an example, in my starter site I have PHP snippets that add a user role, modify the UI, and add functionality that isn’t native to WordPress.
Style.css
The style.css file is a little less intimidating in the fact that you’re going to be much less likely to brick your site by making changes to it, however it does come with some defaults that you’ll likely want to modify.
In the style.css file, you’ll see the Theme Header, like the theme name, a description, and information about its source.

Some of these things will be visible to people who login to your site — even if they don’t dig into the code. Let’s take a look at what we can tweak here to make this child theme more of our own:
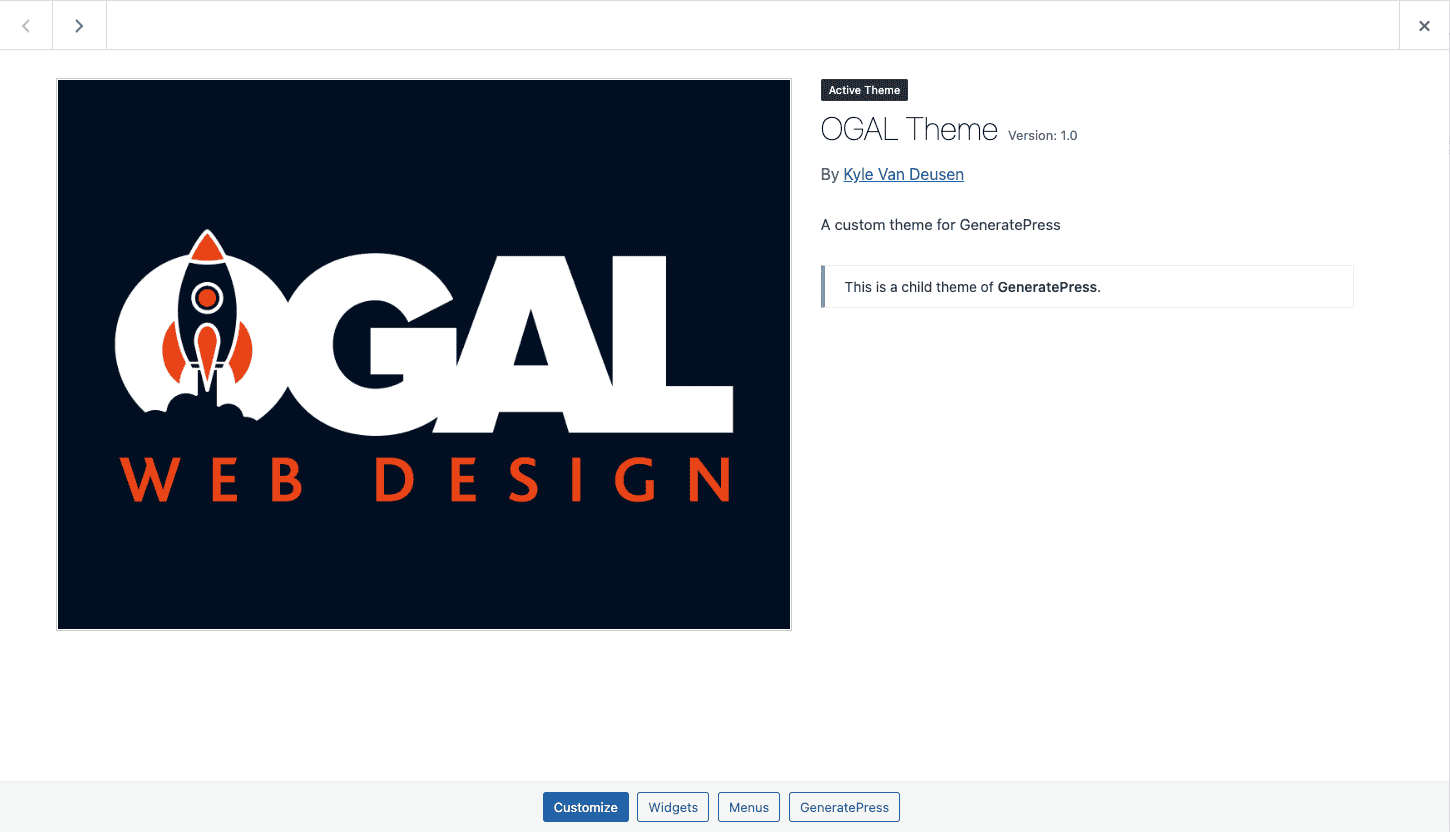
With the child theme installed on this site, we can see the Theme Name, which links to a URL, the theme description, the theme’s author (which links to the author’s URL) and the version number.
We can edit all of these things — and I would encourage you to do so. The only thing we don’t want to edit is the line that says ‘Template: generatepress’. This is your child theme’s link back to the parent theme, GerneatePress.
If you change this line, you’ll no longer have a GeneratePress child theme and you’ll lose everything that comes with GeneratePress.
What might you want to add to your style.css file? Well — any of your custom CSS can go in there instead of putting it in the customizer.
I personally like to use the customizer for testing CSS tweaks, and use my child theme’s style.css file for all of my finalized code.
Lastly, let’s take care of our theme’s image — which will probably be the main thing people see when it comes to your child theme.
Screenshot.png
The screenshot for your image needs to have both the proper dimensions and the proper file name (880x688px, screenshot.png). Because of that, I find it easiest to just open up the screenshot.png file, make my modifications, and then just save over the original file. This way I know I have all of that in place.
Next, we’ll start customizing all these things so we can have our own unique child theme.
Modifying Your Child Theme
Let’s dive into how you can customize this child theme to make it your own.
Customizing Your Screenshot.png
Let’s start with an easy win. Open up the default screenshot GeneratePress supplied us in the blank child theme in your favorite image editing software (I use Photoshop).
Change the background to be your brand’s primary color, and place your logo on top of that.
This isn’t the most creative idea — but at least you’ll be able to see that you’ve personalized your thumbnail once you upload your new version of our child theme. You can, of course, customize this thumbnail to be whatever you want.
Customizing Your Styles.css File
Next, open our styles.css file inside VS Code. Here you’re going to want to change some of the details inside of the Theme Header to brand this theme to your agency. You can see in the sample below how I’ve customized it to fit my agency’s brand.
- Theme Name: OGAL Theme
- Theme URI: https://ogalweb.com
- Description: A custom child theme for GeneratePress
- Author: Kyle Van Deusen
- Author URI: https://kylevandeusen.com
- Template: generatepress
- Version: 1.0
Now that you’ve changed the Theme Header, what else could we add to our child theme stylesheet? Personally, I add all my custom CSS here. But just so you can see it in action, add a simple rule to make the entire background of our site orange (you can get rid of this later), like this:
body {
	background-color: orange;
}
Let’s save our style.css file and move to our last file, the functions.php file.
Customizing Your Functions.php File
If you don’t have any php snippets to add, that’s fine. You don’t have to put anything in this file — you can leave it just as it is.
However, let’s take a look at an example of using our functions.php file to tweak our child theme.
You’ve probably noticed that the admin bar greets users by saying “Howdy”. As a southerner, I appreciate that — but I know a lot of people don’t feel that way.

Let’s add a php snippet to change the word from “Howdy” to “Hello”.
To do that, paste in this code:
function custom_replace_howdy($wp_admin_bar) {
    $my_account = $wp_admin_bar->get_node('my-account');
    $new_title = str_replace('Howdy,', 'Hello,', $my_account->title);
    $wp_admin_bar->add_node(array(
        'id' => 'my-account',
        'title' => $new_title,
    ));
}
add_filter('admin_bar_menu', 'custom_replace_howdy', 25);
And we’ll save the file.
At this point, you’ve customized all parts of your child theme and it’s time to install it on your website!
Installing our new Child Theme
With all of your files saved, you just need to zip your child theme folder and upload it back to our website.
Go ahead and change the name of the ‘generatepress_chilld’ folder to the name of your theme (making sure to use underlines or dashes instead of spaces), then right-click it, and zip the file.
Back inside of your WordPress dashboard, you can go to appearance > themes > and click the ‘Add New’ button.
You’ll upload, install, and activate your child theme.
If we did everything correctly, you should see all of our changes now.

In my example aboce, you can see the theme shows all the details I added to the header and our new screenshot.
The front-end of the site should also have an orange background, which was the little bit of CSS you added to the style.css file (it’s safe to delete that now!).
Lastly, you can see your little PHP snippet has changed the greeting from “Howdy” to “Hello” in the top right corner.
How to Modify Your Child Theme in the Future
Chances are you’ll want to make ongoing edits to your child theme — and there are a couple ways you can do this.
The easiest way is to use the Theme File Editor built right into WordPress.
From the backend of your website you can hover over appearance and click Theme File Editor. Here you’ll see the style.css and function.php, which you can edit directly.

While this is the easiest way, a lot of people feel this having the Theme File Editor enabled is too risky (and likely disable it using their functions.php file). Security isn’t my specialty, so I’ll leave that up to you to research and make a decision on your own.
But let’s talk about the other ways you can modify your child theme.
Another option would be to keep a copy on your machine, open up the files (just like we did before), make edits, and re-upload the theme to your installation.
This works great, but you’ll have to be very good about version control. I’ve found that this can be hard to keep up with, and I run the risk of uploading an older copy, or overriding changes I’ve made in the Theme File Editor.
The other option is to FTP into your website and edit your theme files.
To do this, you’ll need a FTP client — I use FileZilla — to connect to your website. From there, you can open the files from your server on your machine, make the changes, and save them back to the copy on the server.
This process is pretty safe — but some people finding using a FTP client a bit cumbersome.
You’ll have to decide which option is best for you and I’m confident you’ll get comfortable with any of the three options with enough practice.
Wrapping Up
If you’ve never used a child theme before, hopefully this article showed you that it’s not too difficult and will help you get one up and running.
Like I mentioned earlier, there’s really no downside to using a child theme, so even if you don’t plan on making a lot of tweaks to WordPress, it can be beneficial to go ahead and put a child theme in place in case you change your mind down the road.
Trying to add a child theme later is more work — so why not just set things up with future flexibility in place?
Kyle Van Deusen
After spending 15 years as a graphic designer and earning a business degree, I launched my agency, OGAL Web Design, in 2017. A year later, after finding the amazing community around WordPress, I co-found The Admin Bar, which has grown to become the #1 community for WordPress professionals. I'm a husband and proud father of three, and a resident of the Commonwealth of Virginia.


