For a while now I’ve been struggling with having multiple products in my WooCommerce store, and adding customers for specific products to specific groups in MailerLite.
Though they have a WooCommerce / MailerLite integration plugin— they don’t make achieving this simple task obvious.
I won’t tell you how long I struggled with it.
If you are having the same trouble, and if (like me) MailerLite’s support was zero help— then you’ll be delighted to know that the solution is actually quite simple.
By following just a few short steps in this tutorial you’ll be able to place purchasers of any product in your WooCommerce store into any Group in MailerLite.
Keep in mind, you will need a paid MailerLite account to make all this work. You can sign up here.
So let’s go.
Step 1: Download and Install the “WooCommerce – MailerLite” Plugin.
The first order of business is to install and active the WooCommerce – MailerLite plugin, which can be found here or inside the WordPress repository.

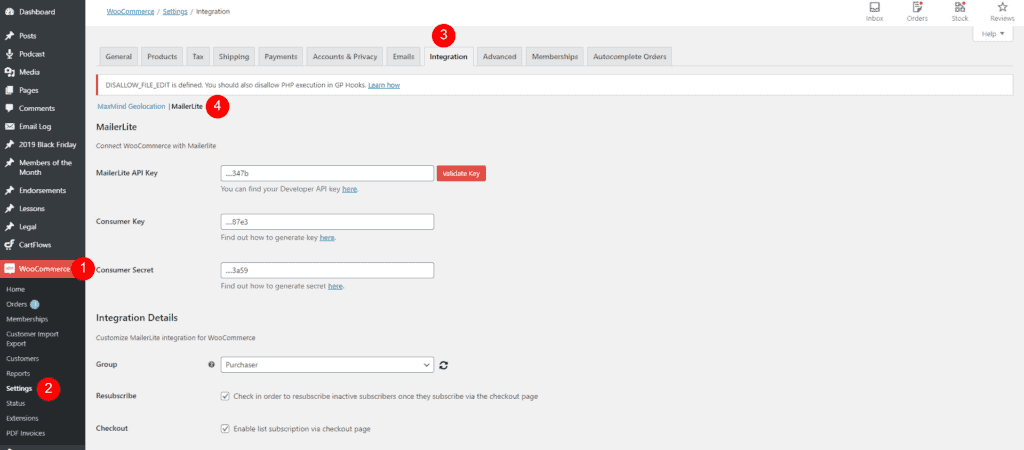
Once the plugin is installed and activated, on the back end of your website, naviagate to WooCommerce > Settings then click the “Integration” tab at the top, finally click the tiny “MailerLite” link just below the tabs.
Here’s a quick, labeled, screenshot that will show you where all the buttons/tabs/links are you need to click:
Step 2: Configure the Plugin & Connect Your MailerLite Account
Next, you’ll need to enter your MailerLite API Key, Consumer Key and Consumer Secret into the MailerLite settings page in WooCommerce.
WooCommerce provides you links to find all these keys, or you can use the links above to find them.
Once you’ve entered those keys and hit the “Validate Key” button, your account is connected and you’re ready to go.
There are further configurations you can make in the plugin on the settings page.
The “Group” dropdown will show all the groups inside your MailerLite account. This will automatically put any purchaser into this group— regardless of product purchased — so you’ll want to make sure it is generic and not a specific product group (I use a group called “Purchasers” which just signifies to me that this subscriber has made a purchase— but at this point doesn’t tell me which product).
There are a few other, fairly self-explanatory, options further down the page. For the purposes of this tutorial, and since those do not have to be configured to get our mission at hand complete— you can explore those on your own.
Step 3: Activate the WooCommerce Integration in MailerLite
Next you’ll need to hop into your MailerLite account.
In the menu dropdown that appears when you click your account name and profile picture (in the top right corner of your screen) click the “Integrations” item from the menu.
Here you’ll see a list of available integrations— including WooCommerce. Next to the WooCommerce integration click the gray “Use” button on the right of its listing.
Under the “E-Commerce Integration” section, ensure that the toggle is set to “On”.

Step 4: Creating an E-commerce Automation – Workflow Trigger
Chances are, if you found this article, you might have already made it this far on your own. This is where the setup becomes a little less intuitive.
For each product/group combination you want to configure, you’ll need to create an Automation.
Click the “Automation” menu item from the primary navigation menu inside MailerLite, then click “Create Workflow”

In the Workflow screen, first name your Workflow in the “Workflow name” field on the right side of your screen. Probably best you name it something specific (like “Product A to Product A Group”). If you have a lot of product purchases to assign to groups you’ll want to easily find these in the future.
Just underneath the “Workflow name” field, you have your “Workflow trigger” options. It will be defaulted to the “Email Automation” tab, but we need to switch that to the “E-commerce automation” tab.
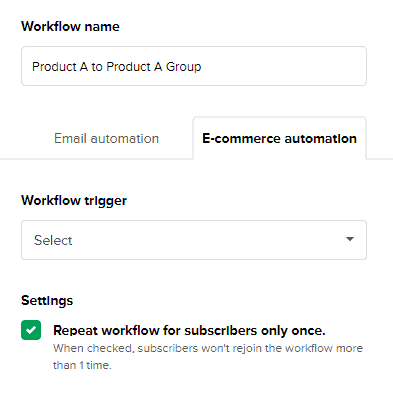
(Perhaps this is your “lightbulb” moment too. Feel free to pause and say “ohhhhhhh”).
Under “Workflow trigger” select “Purchases specific product” from the dropdown menu, then click the gray “Select a product from your store” button.
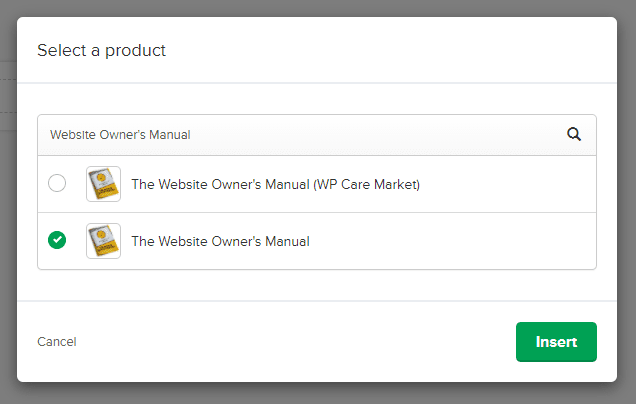
This will open a dialogue box titled “Select a product” that should list all of the products in your store (this is assuming you’ve connected everything with the keys mentioned in Step 2 and your store has finished syncing with MailerLite).
Select the product you’re working on from the list and click “Insert”
You then have the “Settings” option to decide whether or not a subscriber should rejoin the workflow more than 1 time (your choice).
When your selection is made, click the gold “Save” button at the bottom of the screen.
Congratulations— your trigger is set and you’re almost done!
Step 5: Adding Purchaser to a Group
The last step will be to tell MailerLite what to do after the workflow has been triggered by your product purchase.
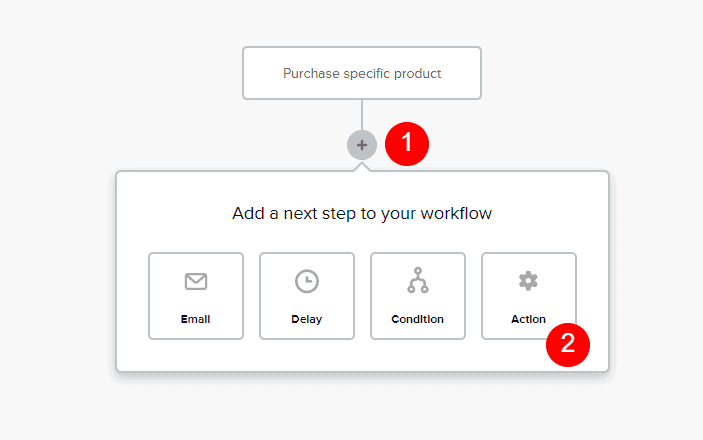
In the main section of your screen you’ll see a box that says “Purchase specific product” (that’s your trigger in the workflow). Just beneath it a circle icon with a plus symbol in the middle— click that.
From the menu of choices, choose “Action”
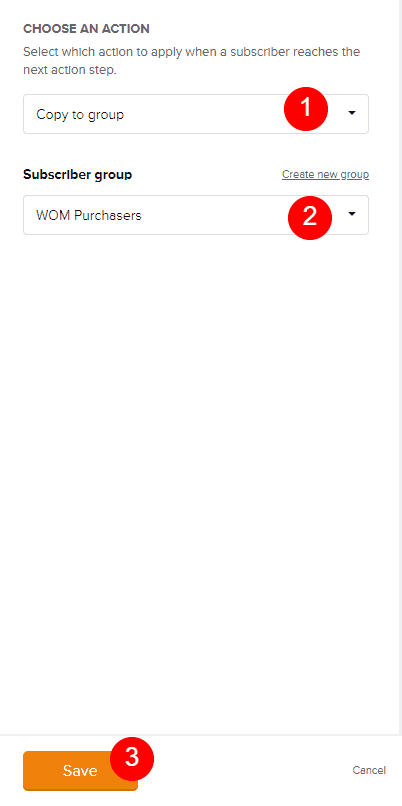
On the right hand side of your screen you should now see a heading that says “Choose an Action”. In the dropdown menu, select “Copy to Group” (you might want to choose “move to group” but you’re safer from disturbing other workflows if you use the “copy” selection).
Then in the next section you will choose your group from the dropdown list, or (if you haven’t yet created your group) you can click “Create a new group”.
Once your group is created/selected, hit the gold “Save” button at the bottom of the screen.
Step 6: Activate Your Automation
Your last step is to turn your automation on, which is easy to miss.
In the top right of your screen you’ll see your automation name and a “on/off” toggle switch. Move the toggle from “off” to “on” and your new automation is ready to go!
Final Thoughts & More Ideas
You’ll want to repeat steps 4 through 6 for each of your products so that you can add your customers to specific groups depending on which product(s) they purchase from your WooCommerce store.
You can also use these automations to send “thank you” emails or create an entire new funnel for your customer. To do that, simply add more actions to your automation to include emails, delays, or even conditions.
Using conditions is a great way to cross-sell to your customers. You could add a condition in your automation to see if your “Product A” customer has purchased “Product B”. If not, then you could send them an email introducing your other product(s)— the options are limitless!
I hope this article helped, and if you have any questions don’t hesitate to join our Facebook community, The Admin Bar. There are over 3,000 of us in there happy to help!
Cheers!
