I’m currently working on a new website for a gym client, and one of the features they requested is a dedicated page showcasing all the personal trainers across their various locations. Initially, I set this up with static information to send over as a proof for approval. Now that the client has approved the design, I’m transitioning the setup to use custom post types for each trainer. This approach will allow us to dynamically manage and display trainer information across the site.
In this post, I’ll walk you through the process of creating a custom post type for trainers, setting up custom fields, and dynamically displaying the information on the website. This method is not only efficient but also makes future updates and management much easier.

Why Use Custom Post Types for Staff Pages?
Setting up custom post types for staff members, like trainers in this case, has several advantages:
- Easier Querying Across the Website: You can dynamically pull trainer information into different sections of the site, such as location pages or other relevant areas.
- Simplified Management: Updating trainer details, such as their bio or image, can be done directly in the backend without touching the design or layout.
- Consistency: Using a single template ensures that all trainer profiles look uniform and professional.
If this sounds like something you’re interested in, let’s dive into the process.
Setting Up the Custom Post Type
Step 1: Create the Custom Post Type
To get started, I used Advanced Custom Fields (ACF) Pro, but you can also use the free version for this setup. Here’s how I created the custom post type:
- Navigate to ACF > Post Types in the WordPress dashboard.
- Click Add New and name the post type “Trainers” (plural) and “Trainer” (singular).
- Set the post type key to
trainers. While the key isn’t critical, it helps keep things organized. - In the advanced configuration, I removed unnecessary fields like the featured image and editor. Instead, I opted for custom fields to keep the interface clean and focused.
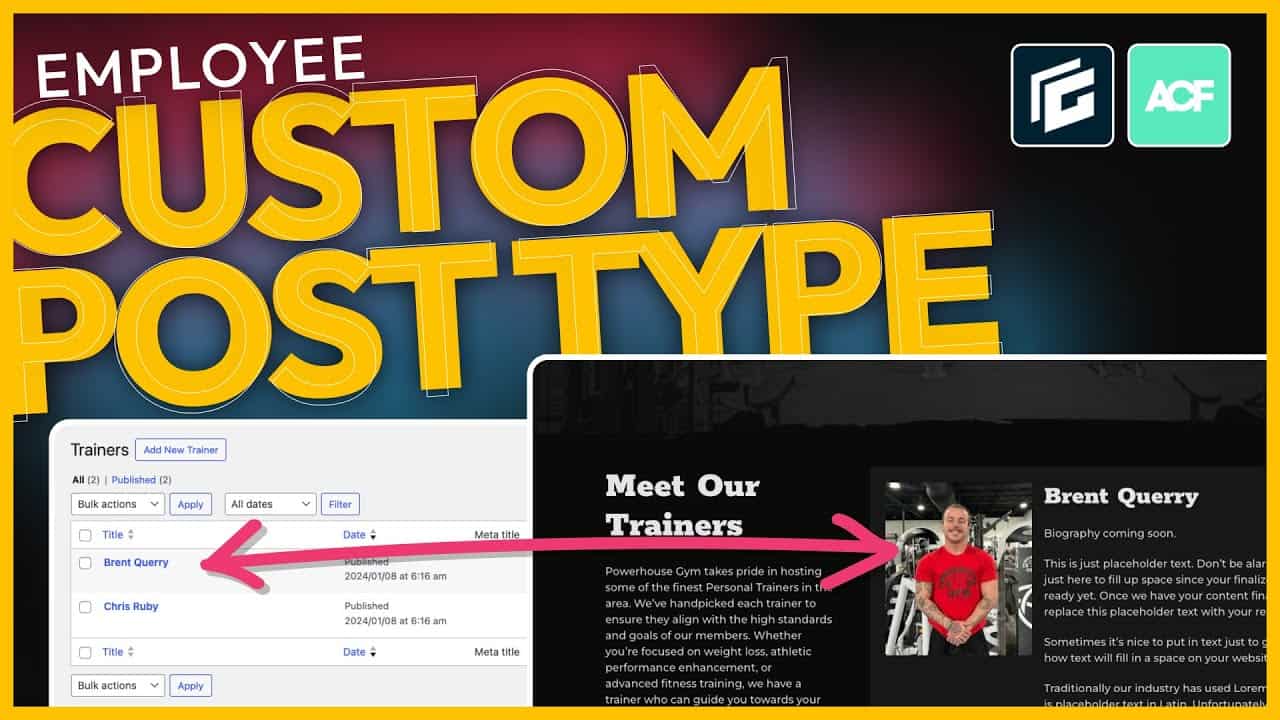
Once saved, the new “Trainers” custom post type appeared in the WordPress dashboard.
Step 2: Create Custom Fields for Trainers
Next, I set up the custom fields that would store the trainer-specific information:
- Go to ACF > Field Groups and click Add New.
- Name the field group “Trainers” to match the custom post type for clarity.
- Add the following fields:
- Trainer Bio: Use a WYSIWYG editor to allow for rich text formatting like bold, italics, and underlining.
- Trainer Image: Use the image field type. I explicitly named this field “Trainer Image” to avoid confusion when connecting dynamic data later.
- Set the field group to display only when the post type is “Trainer.”
After saving, the custom fields were ready to use.
Adding Trainer Profiles
With the custom post type and fields in place, I added profiles for two trainers as an example:
- Navigate to Trainers > Add New.
- Enter the trainer’s name in the title field.
- Add placeholder text (e.g., Lorem Ipsum) for the bio while waiting for the client’s final content.
- Upload the trainer’s image using the custom image field.
- Click Publish.
I repeated this process for both trainers, Chris Ruby and Brent, and confirmed that their profiles appeared in the “All Trainers” section of the dashboard.
Displaying Trainer Profiles Dynamically
Step 1: Setting Up the Query Loop
To display the trainer profiles dynamically on the website, I used a query loop block:
- Edit the Trainers Page and add a new query loop block.
- Configure the query loop to pull posts from the “Trainers” custom post type.
- Adjust the layout to ensure each trainer profile takes up 100% width for a clean, single-column design.
Step 2: Connecting Dynamic Data
Next, I connected the dynamic data fields to display the trainer information:
- Trainer Name: Enable dynamic data for the name field and set the content source to “Title.”
- Trainer Bio: Enable dynamic data for the bio field and set the content source to “Post Meta.” Use the key
trainer_bioto match the custom field name. - Trainer Image: Enable dynamic data for the image field and set the content source to “Post Meta.” Use the key
trainer_image.
After connecting the data, I added a vertical gap of 20 pixels between each trainer profile for better spacing.
Step 3: Preview and Test
I saved the changes and previewed the page on the front end. The trainer profiles displayed perfectly, with their names, bios, and images dynamically pulled from the custom post type. I also tested the design on mobile and tablet breakpoints to ensure responsiveness.
Wrapping Up
Setting up custom post types for staff pages is a straightforward process that can save time and effort in the long run. In this example, I created a custom post type for trainers, but the same approach can be applied to other types of content, such as gym locations or classes. By using custom fields and dynamic data, you can create a flexible and scalable system for managing website content.
This setup took just a few minutes, and the result is a dynamic, easy-to-manage staff page that looks professional and is future-proof for updates. If you’re building a website with similar needs, I hope this guide helps you streamline the process!
Kyle Van Deusen
After spending 15 years as a graphic designer and earning a business degree, I launched my agency, OGAL Web Design, in 2017. A year later, after finding the amazing community around WordPress, I co-found The Admin Bar, which has grown to become the #1 community for WordPress professionals. I'm a husband and proud father of three, and a resident of the Commonwealth of Virginia.