Email deliverability is the number one support ticket topic we receive for our WordPress form plugin WS Form. The vast majority of the time this is due to a misconfigured or nonexistent SMTP service which is critical for sending email efficiently.
WordPress sends a variety of emails to keep your site and its users informed. These emails can be broadly categorized into two types: administrative emails and user-triggered emails. Administrative emails include notifications about new user registrations, updates, and site maintenance alerts. User-triggered emails encompass password reset requests, new user welcomes, form submissions, and order confirmations for e-commerce sites.
Ensuring these emails are reliably delivered is crucial for maintaining communication and trust with your users and vital for the website owner to receive critical notifications from forms or WordPress itself.
Learn better by watching? This article was based off a live webinar!
Email Delivery Methods
By default, WordPress uses a function called wp_mail to send emails. wp_mail is in fact a wrapper for PHPMailer. PHPMailer is an open-source library for PHP that facilitates sending emails using various protocols and methods.
While the wp_mail function is straightforward, it has several limitations. When used without the use of a Simple Mail Transfer Protocol (SMTP) service, emails will often end up in spam folders or not being delivered at all because they lack proper authentication.
To overcome this issue, using a transactional email service greatly improves the efficiency of email deliverability.
Benefits of Using an SMTP Service
SMTP is actually a protocol for sending emails that dates back to 1981. It has remained pretty much unchanged since then and the term “SMTP service” is now loosely used to describe modern day transactional email services such as Postmark or Mailgun.
SMTP services sit between WordPress and the email recipient. Emails are sent from WordPress to the SMTP service either as a regular email (itself using SMTP), or via an API request. They then send the email onto the recipient.
The purpose of the service is to effectively “fix” the email prior to it being sent to the recipient, adding headers and other information to the email so that the receiving email service (e.g. GMail) deems the email to have come from a trusted and reliable source. They are specifically designed for sending emails, providing greater stability and efficiency when sending emails. Whilst not covered here in detail, they offer built-in authentication features such as SPF, DKIM, and DMARC, which help improve email deliverability and reduce the chances of emails being marked as spam.
APIs provided by SMTP services also offer additional functionality such as the email scheduling and better error handling. Many SMTP services also offer comprehensive reports on email delivery, opens, clicks, and bounces, allowing you to monitor the effectiveness of your email communications.
Your SMTP Options
To efficiently send emails from a WordPress website, you need two things:
- An SMTP plugin to connect WordPress to an SMTP service.
- An SMTP service to send your emails to recipients efficiently.
First, let’s take a look at some of the available SMTP services.
SMTP Services
Here’s a comparison of some popular SMTP services, each with its own set of features and pricing:
Mailgun
Known for its powerful API, Mailgun offers robust email sending capabilities and advanced analytics. It is ideal for developers and businesses needing detailed control over their email infrastructure.
- Free Tier: 5,000 emails/month
- Paid Tier: Starts at $35 for 10,000 emails/month
Mailgun is owned by Sinch.
Postmark
Focused on transactional emails, Postmark emphasizes speed and reliability. It’s perfect for businesses that prioritize timely delivery of critical emails.
- Free Tier: 100 emails/month
- Paid Tier: Starts at $15 for 10,000 emails/month
Postmark is owned by ActiveCampaign but does not require an ActiveCampaign account to use it.
SendGrid
A user-friendly service with excellent deliverability, SendGrid provides an intuitive interface, strong API, and comprehensive reporting. It’s a great choice for businesses of all sizes.
- Free Tier: 100 emails/day
- Paid Tier: Starts at $19.95 for 10,000 emails/month
SendGrid is owned by Twilio.
Amazon Simple Email Service (SES)
Amazon SES requires more technical knowledge to set up than services like Postmark and Mailgun, but it is cost-effective.
- Pricing: $0.10 per 1,000 emails
- Data Rates: Additional charges for email attachments
Amazon SES is part of Amazon Web Services (AWS).
WordPress SMTP Plugins
WordPress SMTP plugins provide an integration between WordPress and SMTP services. Some SMTP services offer native plugins for WordPress, including:
These plugins provide a convenient way to configure your website to use their services.
Additionally, there are many other SMTP plugins that provide the ability to connect to various other SMTP providers, such as FluentSMTP, Post SMTP, and WP Mail SMTP. Check out the WordPress plugin repository for more options.
How to Set Up an SMTP Solution
Nowadays, setting up an SMTP service on your WordPress site is fairly straightforward.
This tutorial demonstrates how to use the popular Postmark service to quickly and easily set up SMTP for your WordPress website.
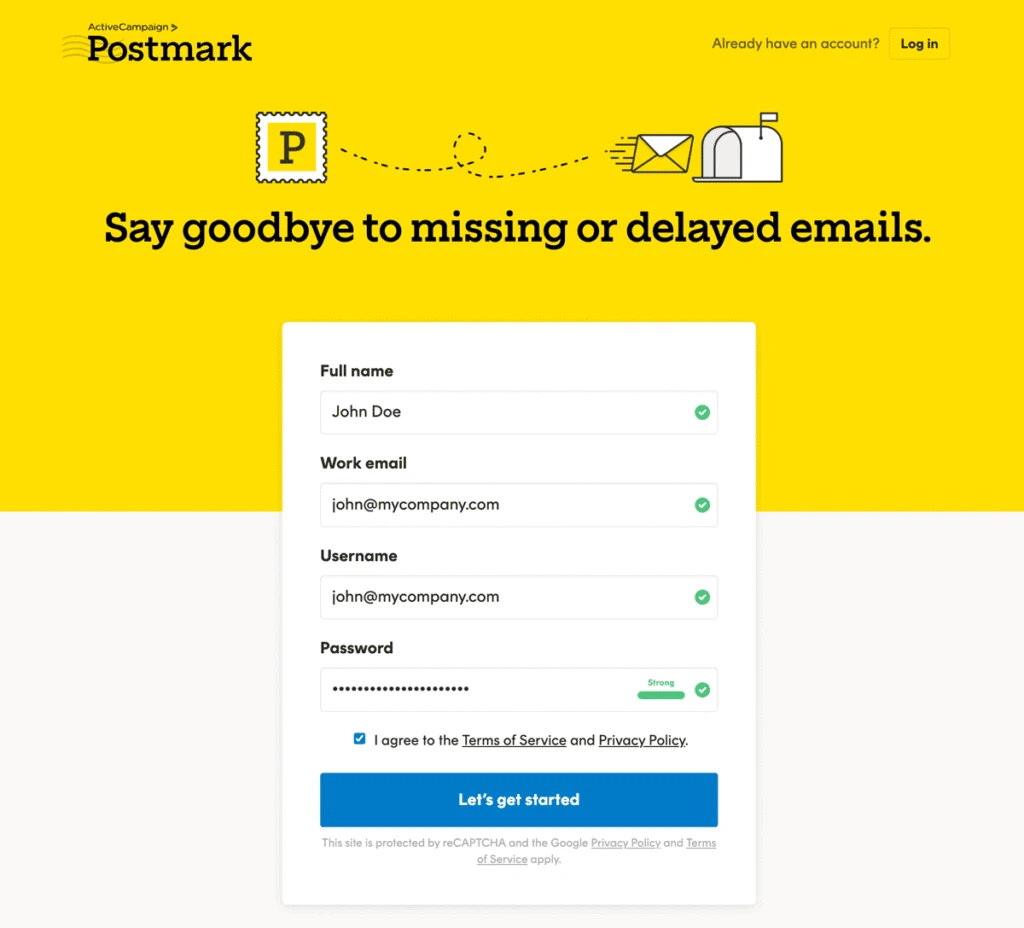
1. Sign Up
The first step is to sign up for a Postmark account. If you are setting up SMTP on behalf of your clients, you can bundle all your clients into a single account.
2. Setting up a Sender Signature
Once your account is verified you will be brought to the Postmark dashboard.
The first thing you need to do is set up a Sender Signature. A Postmark sender signature is a crucial step to authenticate and authorize email addresses or domains used for sending transactional emails, enhancing security, deliverability, and compliance.
Click on Sender Signature at the top of the dashboard.
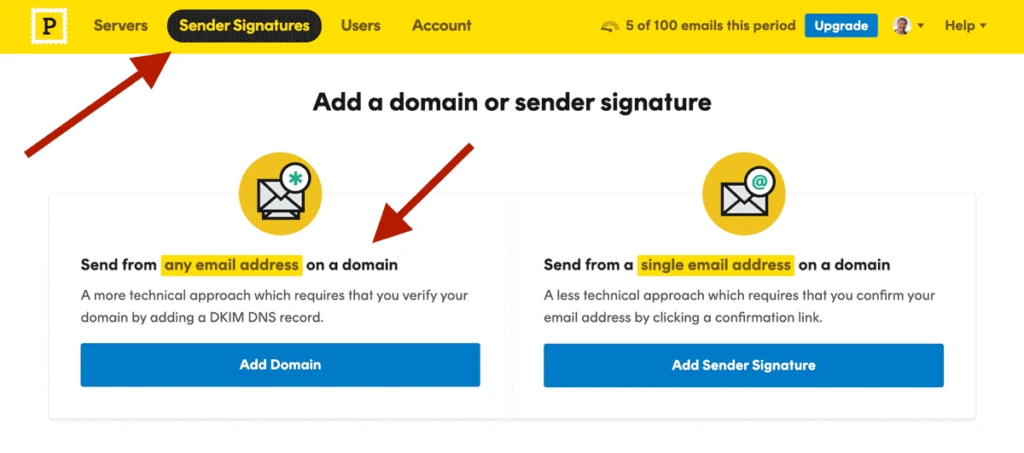
Postmark provides two options; sending from a domain or a single email address. I recommend using the Send from any email address on a domain option. This will enable you to send emails from any email address on your domain name and will ensure you don’t have to run through this process again in future should you wish to use a different email address.
Click Add Domain.

Postmark will now prompt for you to enter your domain name. Once entered, click Verify domain.
Next, Postmark is going to provide you with two DNS records that you need to add to your domain name.
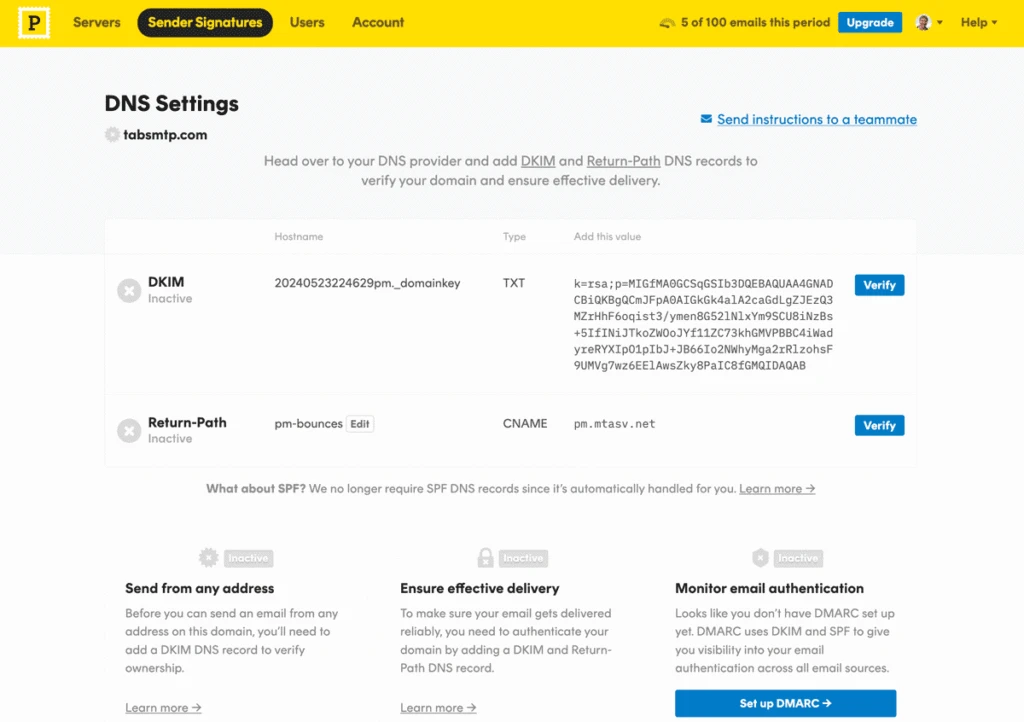
The two DNS records that need to be added will both enable Postmark to validate your ownership of the domain name, and also allow the ability for them to provide effective email deliverability on your behalf.
DKIM (DomainKeys Identified Mail) is an email authentication method that allows the receiver to verify that an email claiming to come from a specific domain was indeed authorized by the owner of that domain through a digital signature.
The Return-Path is the email address where bounce messages (non-delivery reports) are sent, typically specified in the “Return-Path” header of an email. It indicates the sender address for handling errors and non-delivery notifications.
But enough of that, let’s configure those DNS records. In this example we’ll use GoDaddy.com but the same procedure applies to pretty much any DNS provider. If you need help with this part of the process, I recommend reaching out to your DNS provider.

This is the GoDaddy.com DNS Management page. We click Add New Record and then use TXT as the Type. Postmark makes it super easy to copy the required Name (Hostname) and Value from their admin page by simply clicking the values. We paste these into the GoDaddy.com page and then click Save. We can leave the TTL value as the default value.
We then repeat this process for the CNAME.
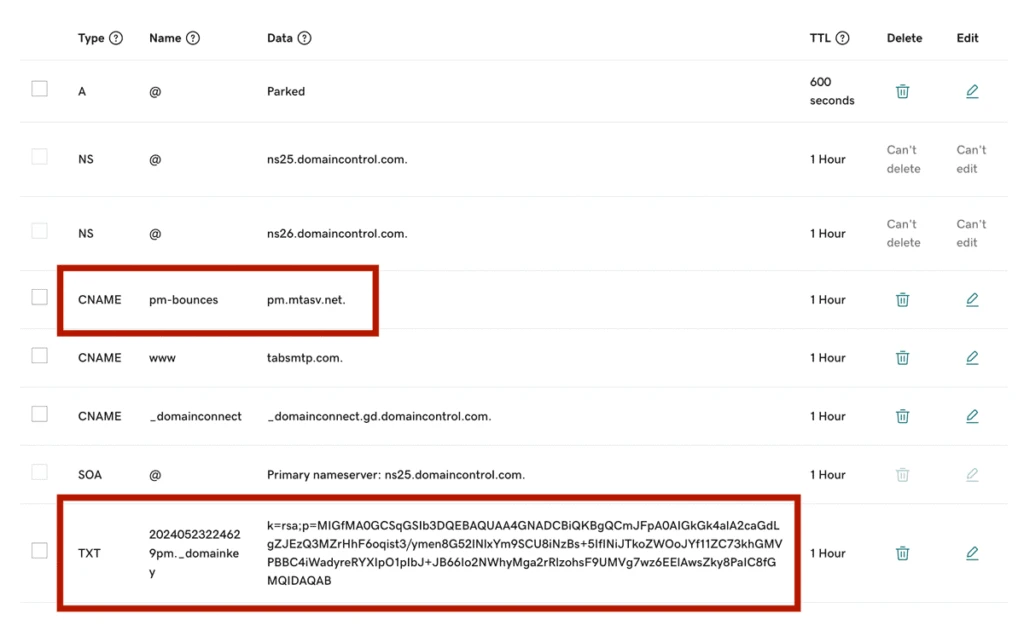
You can now see the newly added CNAME (Return-Path) and TXT (DKIM) records added to the DNS for our domain name.
The next step is to verify these records with Postmark. It is important to bear in mind that it might take a few minutes to several hours for these DNS records be available, therefore verification may not happen immediately.
To verify the records we click the Verify button on the Postmark DNS Settings page.
Once verified, the DNS Settings page will indicate that both DNS records have been successfully set up and verified by Postmark.

Thats the hard part out of the way! Now it gets easier, I promise!
Next we need to set up a API key that will be used to connect WordPress to Postmark. To do this, we click on the Servers link at the top of the Postmark dashboard.

Next we click the Create server button.
In Postmark, a server is a logical container that groups together related email activity, such as transactional or marketing emails, allowing you to organize and manage your emails based on different applications, environments, or purposes. Each server has its own API token, message streams, and settings to facilitate an organization.
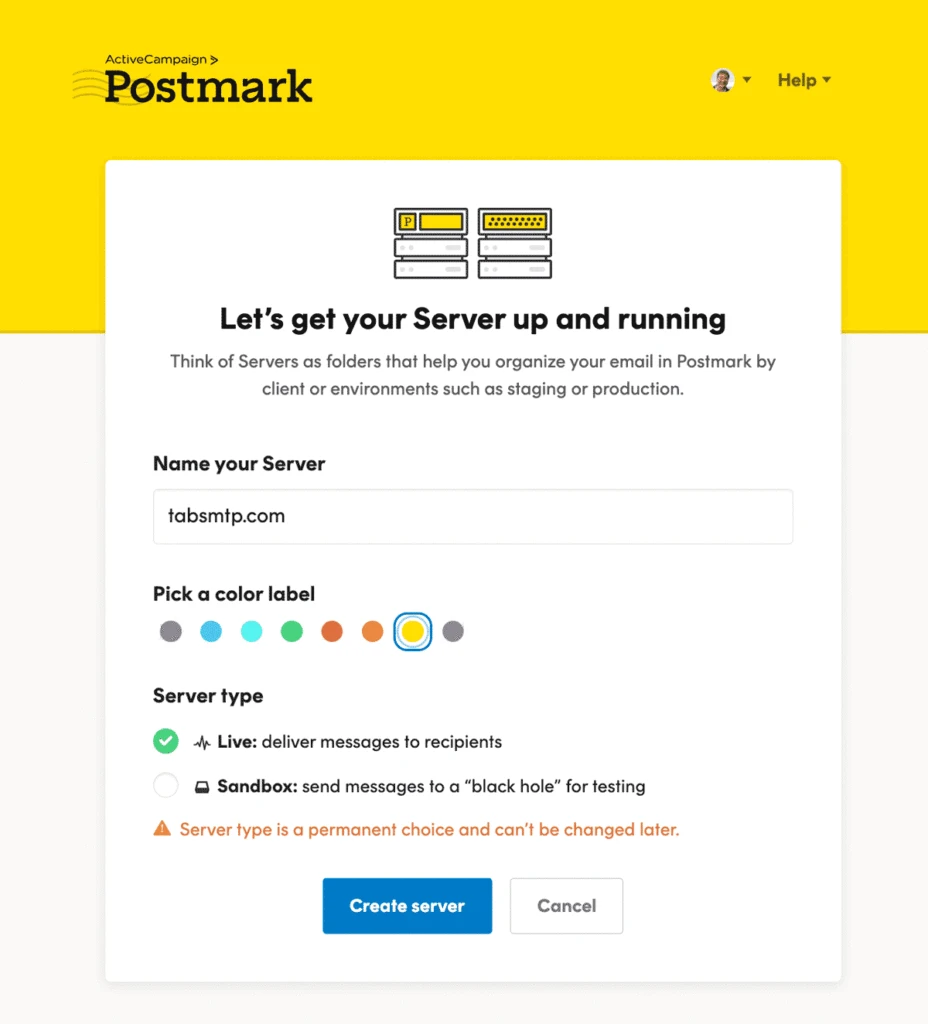
In this example, we’re creating a server with a name that will match the validated domain name we created. You can name it anything you wish but you may find this naming convention helpful when you have many clients in a single Postmark account.
We’re of course choosing The Admin Bar yellow and we’ve chosen Live as the server type as we intend to use this server in a production environment.
Next we click the Create server button.
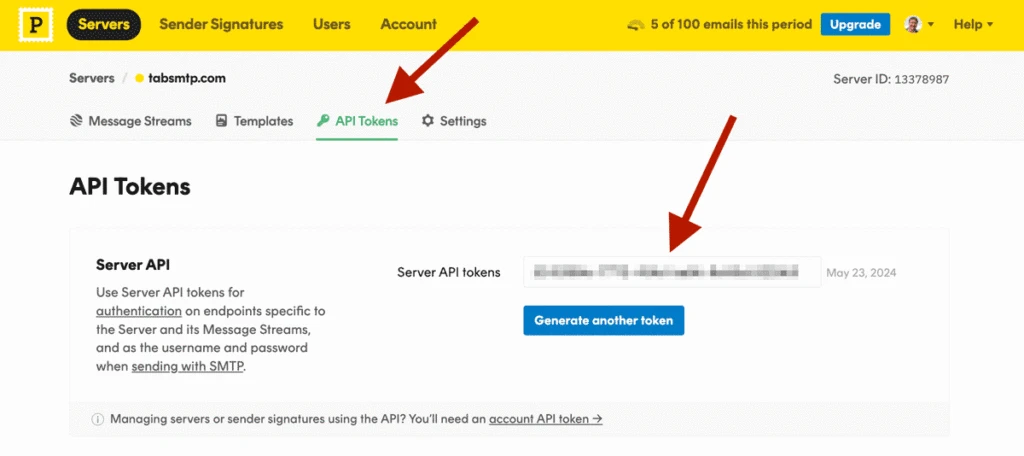
Once the server is created, we need to grab the API token. We’re going to need that for the Postmark WordPress plugin. To get the API token, click on the API Tokens tab, then click on the API key itself and Postmark will copy the key to your clipboard.
We’re almost there! All that remains is to set up the Postmark plugin in WordPress!
Log in to your site as an administrator and then click on Plugins from the WordPress admin menu. Next, click Add New Plugin and search for:
activecampaign postmark
WordPress will then show the Postmark plugin.
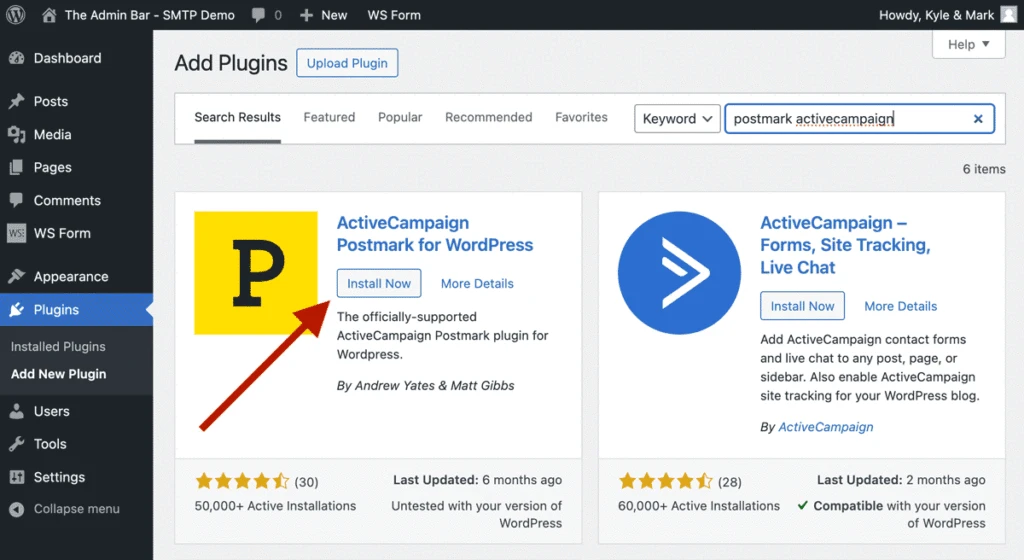
Click Install Now and then Activate.
The Postmark settings can be found in Settings > ActiveCampaign Postmark. Click on that and we’ll be prompted to enter the API key we copied earlier.
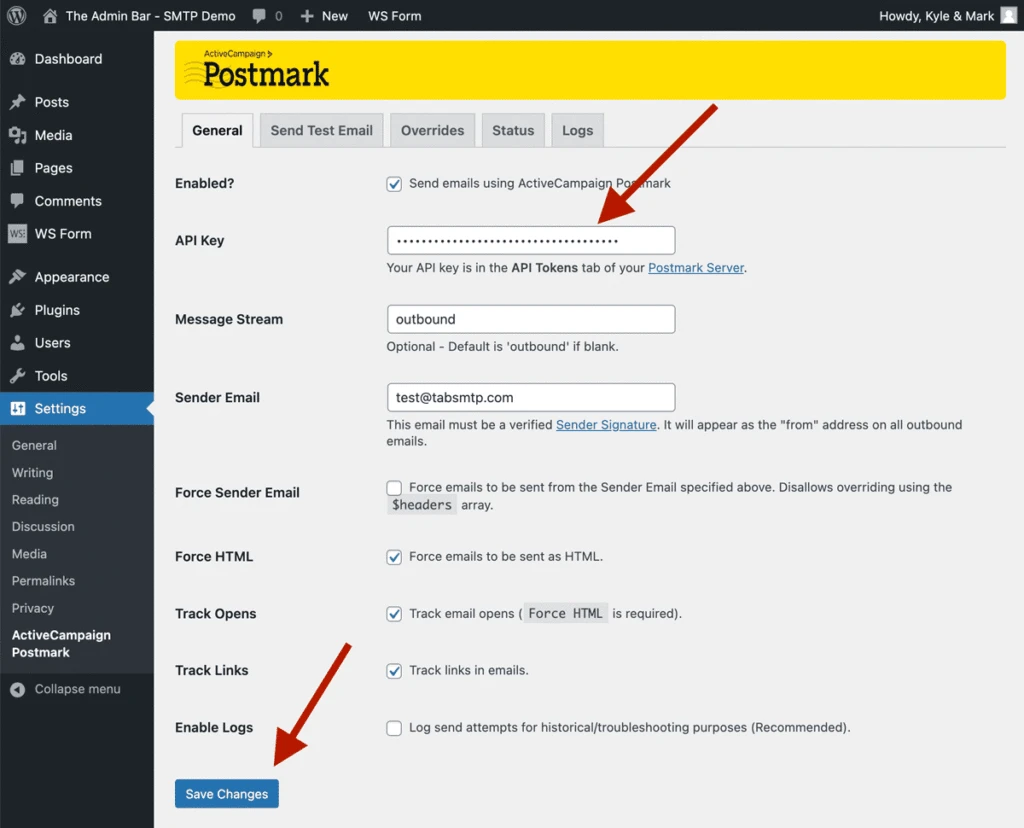
- Enabled should be checked.
- Paste the API Key we copied earlier.
- Enter outbound in Message Stream (or leave it blank). This ensures you are using the transactional message stream in your Postmark server.
- Choose and enter a Sender Email.
- Optionally check the Force Sender Email. If this is checked, all emails sent from WordPress will use the Sender Email as the From address.
Important: The Sender Email must be an email address that contains the domain name you validated earlier under Sender Signatures in Postmark.
And that’s it! Now you’re ready to send a test email.
Click on Send Test Email at the top of the Postmark settings page.
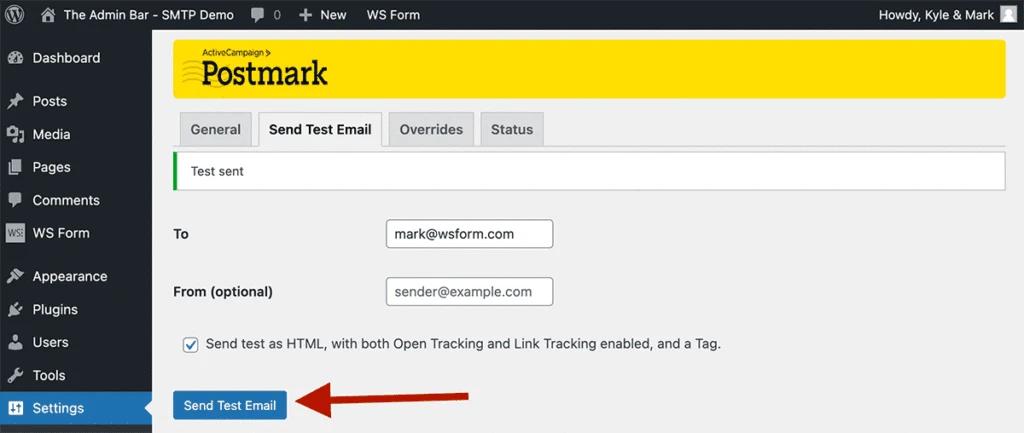
Enter a To email address and then click Send Test Email. Test sent should appear at the top of the page to signify the email was sent successfully.
You are now set up to send emails from WordPress!
Offering SMTP as a Service
For web developers and agencies, setting up SMTP can be a valuable service offering. By ensuring reliable email delivery for your clients, you enhance their site’s functionality and user experience.
Here’s how you can include SMTP setup in your service portfolio:
Assess Client Needs
Determine the volume and type of emails your client’s site sends to recommend the most suitable SMTP service. Consider the services outlined in this article.
Implement and Configure
Set up and configure the chosen SMTP service, ensuring all settings are optimized for security and deliverability.
Decide on a Billing Structure
Be careful to predict and charge for emails according to the clients needs. Simple business-to-business websites may send only a handful of emails per day, whereas a busy e-commerce website could be sending many hundreds or thousands of emails per day for order and confirmation, as well as shipping and delivery notifications.
Ensure you cover yourself for any potential sudden surges in email deliverability in your maintenance agreement.
Conclusion
By mastering SMTP with WordPress, you will not only enhance your site’s email capabilities but also provide a valuable service to your clients, ensuring their communications are reliable and professional.
Mark Westguard
Mark is the founder of WS Form, a WordPress form plugin at the forefront of innovative form-building solutions. His career, spanning over 25 years, includes running web agencies in both the UK and the USA. Mark is a familiar face at flagship WordCamp events, where he actively participates and sponsors, with a commitment to advancing the WordPress ecosystem.